Add and Edit Fines and Record Payments
You can assign fines to library materials and resource items. Destiny tracks the status of the fine until it is paid.
|
Note: You can add fines in Library Manager and Resource Manager. |
Add a Fine
Follett recommends searching by barcode to ensure you find the correct patron.
- Select Circulation > Fines.
- In the Find Patron field, scan or type a patron barcode or type a patron name.
- If you scan a barcode, the patron's information appears automatically.
- If you type the barcode or name, press Enter or click Go. If a list of patrons appears, select the one you want.
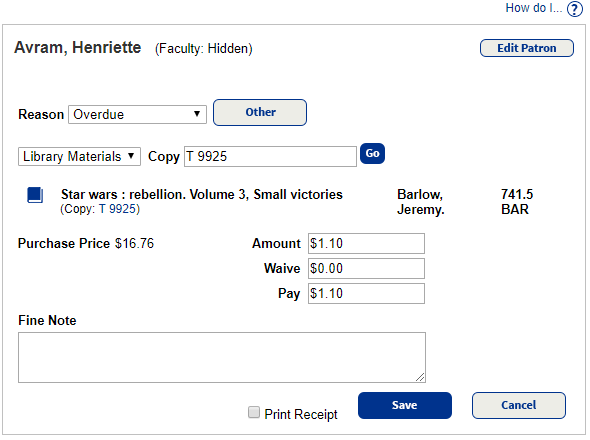
- Click Add Fine. The Add Fine page appears.
- From the Reason drop-down, select the reason for the fine.
- (Optional) To add a new Fine Type, click Other… and complete the steps in Manage Fine Types.
- Select the material type from the drop-down under Reason.

- If you selected a fine that is associated with a specific copy (such as Broken Binding, Damaged, Missing Barcode, Torn Pages or Water Damage), you need to identify the copy. To do so, type or scan the copy barcode in the Copy field and click Go.
Note: You can also perform a search for the copy by entering a keyword from the title in the Copy field and clicking Go.
- If you selected Resource Items, type or scan the resource you want in the Resource Item field and click Go.
- Enter values in the Amount, Waive and/or Pay fields.
- If you want to include a note, type it in the Fine Note field. The fine note appears on the Edit Fine page and in the patron’s Fine History.
- To print a receipt, select the Print Receipt checkbox.
- Click Save. If you are waiving part of the fine, a pop-up might appear. Enter the reason for the waiver, and then click Save.
Note: If you chose to print a receipt, the printable page appears.
Edit a Fine
- On the Fines page, find the resource you want.
- To edit a fine, click
 . The Edit Fine page appears.
 - Make changes accordingly, and then click Save.
On the Edit Fine page, you can either waive or pay an individual fine. You can also update the Fine Note field.
Delete a Fine
To delete a fine, click ![]() , and then click Yes in the confirmation pop-up.
, and then click Yes in the confirmation pop-up.
Refund a Fine
To refund a credit, click Update, and follow the steps in Refund a Fine Credit.
Accept Fine Payments
Library Manager lets patrons apply fine payments to the combined balance of all fines they owe or to an individual fine. When the patron asks to apply a payment to a combined balance, Library Manager does so in date-incurred order – oldest to newest. If the patron has local and off-site fines, Library Manager pays the local fines first.
If your Destiny Administrator chooses to Allow fines to be paid/waived at any site
, you can pay, waive and issue refunds for off-site fines as well.
|
Note: You can only manage copy-specific fines for schools within your district. |
To enter a payment toward all fines:
- Select Circulation > Fines.
- In the Find Patron field, scan or type a patron barcode or type a patron name.
- If you scan a barcode, the Fines page opens automatically.
- If you type the barcode or name, press Enter or click Go. If a list of patrons appears, select the one you want.
- In the Pay field, enter a payment amount.
- If you want to print a receipt for the payment, select the Print Receipt checkbox.
Note: If you want to print a receipt without entering a payment, click Print It. If the patron has outstanding fines, you will have the option to apply the refund to them.
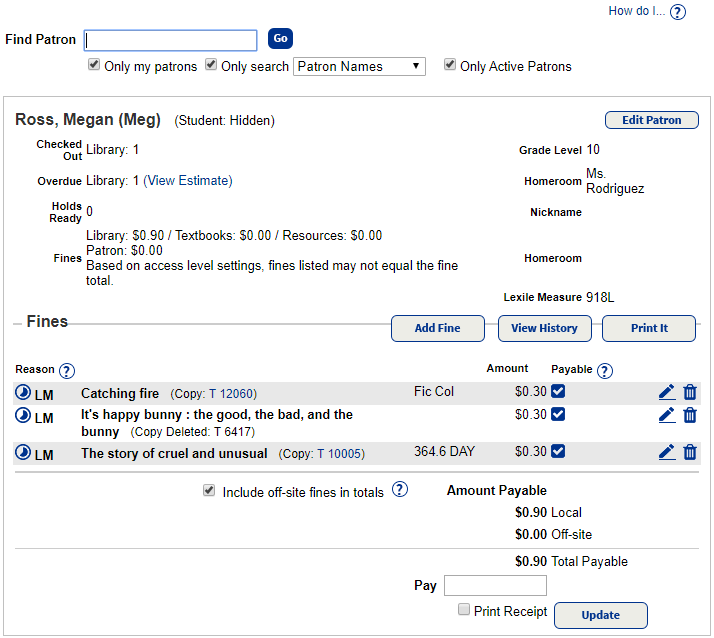
- Click Update.
Note: If you chose to print a receipt, the printable page appears.
To enter a payment toward a specific fine:
- Select Circulation > Fines.
- In the Find Patron field, scan or type a patron barcode or type a patron name.
- If you scan a barcode, the Fines page opens automatically.
- If you type the barcode or name, press Enter or click Go. If a list of patrons appears, select the one you want.
- Next to the fine amount, click .
- In the Pay field, enter the amount paid.
- Click Save.
For more on fines, see the Reports & Fines (Library Manager) Articles on Follett Community.