Import Title Records
|
For training resources
|
Teachers and students rely on your library for up-to-date resources and information, so you need to be able to add new materials to your catalog quickly and efficiently. Whenever your vendor gives you an importable file of MARC records for new titles or copies, use Destiny Library Manager’s easy-to-use title import function.
- Select Catalog > Import Titles > Add/Update sub-tab.
-
In the Title Matching section, select the checkbox for how you want Library Manager to compare the incoming records for a match in your catalog: Strict or Relaxed.
Note: Follett recommends you use Strict Title Matching, which requires a match on the LCCN, ISBN or ISSN, plus the title and material type. If the author and publication dates are present, they are also compared. If an incoming record contains a 13-digit ISBN and your district collection record has the 10-digit form of that ISBN – or the reverse – Library Manager considers them the same ISBN.
- Select how you want Library Manager to handle incoming records if its MARC record data matches existing records in your catalog.
Note: Follett recommends you replace your existing title records with the import records if they have more information than your records. By default, Library Manager replaces the existing records but preserves and merges local tags or fields of information that apply specifically to your library.

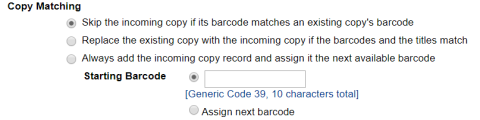
- In the Copy Matching section, select how you want Library Manager to handle any copy records where an incoming barcode matches a barcode already in your catalog.
Note: Follett recommends you skip the duplicate incoming copy. If you choose to skip an incoming copy when the barcode matches an existing copy’s, the report generated at the end of the import will identify any skipped copies. You will need to add these copies manually.
- In the Assign Copy Information section, click Update.
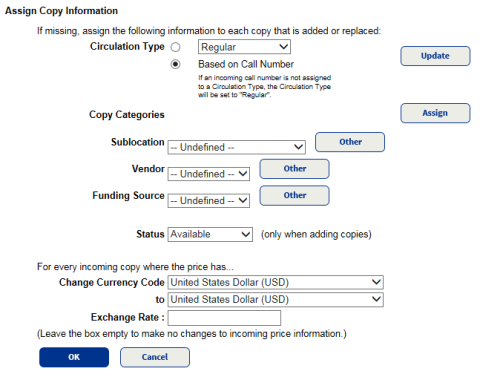
- Next to Circulation Type, do either of the following:
- To assign all the copies in the import file to a specific circulation type, select the first option, and use the drop-down to select a type.
Note: Selecting this option will assign every item in the import file to the selected circulation type. Follett does not recommend selecting this option if the import file contains materials with various circulation types.
Based on Call Number
- Assigns the copies in the import file to different circulation types.
Note: To review or update the library’s circulation type/call number associations, click Update.
-
Use the following table to complete the fields:
Field Definition Copy Categories To assign all the copies in the import file to one or more copy category that was created prior to the import.
Note: To select the appropriate category descriptions, click Assign, and then click OK.
Sublocation Use this drop-down to assign the copies in the import file to a specific area in your library.
Note: To add a location/genre/subject, click Other.
Vendor Use this drop-down to assign the copies in the import file to the vendor you purchased it from.
Note: To add a new vendor, click Other.
Funding Source Use this drop-down to assign the copies in the import file to a particular funding source.
Note: To add a new funding source, click Other.
Status You can apply a status, including In Processing, to copies being added during an import. Change Currency Code - To change the price of copies being imported, select the current and appropriate currency in the Change Currency Code and to drop-downs.
- Enter an Exchange Rate, or leave the field blank so no changes are made.
- Click OK.
-
Click Choose File, and browse to the location of your import file.
Note: If you are importing title and copy records from a vendor website, you must first download the records to a folder or your desktop.
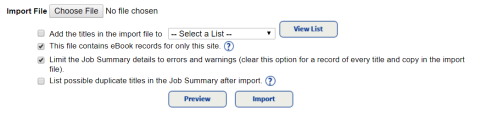
- In the Import File section, do the following:
- To add the incoming titles to a previously created Resource List, select Add the titles in the import file to and choose a Resource List from the drop-down.
- If your import file contains eBook records that belong only to your school, select This file contains eBook records for only this site. This prevents other sites in your district from being able to view and access the eBooks.
- To limit the details in your import report to errors and warnings, select Limit the Job Summary details to errors and warnings.
Note: Deselecting this checkbox will create a record of every title and detail in the import file on the import report.
- To list possible duplicate titles in the report summary after the import, select List possible duplicate titles in the Job Summary after import.
- Click Preview to have Library Manager compare incoming records with existing records, and generate a Job Summary without actually importing the records.
Note: Follett recommends that you check the results before importing the records so that you can review the report and decide whether the import settings need adjustment before you import.
- If you are happy with the preview, click Import to begin the import. The Job Manager opens, and your report displays as In Progress at the top of the list.
-
When the status is Completed, click View.
Note: If any copies show as “skipped” on the report, you must add them manually.